Implementing the Magic Eraser Feature in the ProperShot android app
At ProperShot, we’re developing solutions for real estate agents to help them create the best property listing possible, solutions that are AI-powered of course. With our app, they can easily obtain a description and take pictures of properties they’re selling/renting, enhancing them via different tools, like home staging, wall painting, sky replacement and the very famous magic eraser! Don’t hesitate to give it a try!
The magic eraser was first available on the webapp, but we decided to also implement it on the mobile apps (iOS & Android). This article focuses on how we developed it on the Android app, using Compose (the app is a modular single activity 100% Compose one)
The requirements for the feature were the following:
- allow our users to brush some part of the picture they want to erase
- let them zoom in, so that they can have a more precise area selection
- have previous/next buttons to easily access selection’s history
- as a bonus, be able to tap on the picture and have the object automatically brushed (Magic Touch)
Here are the results:


The article falls into 9 parts:
- How does the Magic Eraser tool work under the hood?
- Setting up the screen
- Adding a canvas to start brushing
- Handling the canvas size properly
- Adding zoom support
- Implementing the Magic Touch
- Improving the Magic Touch
- The drawbacks of the Magic Touch
- Final thoughts
How does the Magic Eraser tool work ?
Before diving into the code, let’s talk about how the tool itself works. At ProperShot we have a Computer Vison (CV) team that takes care of all the AI related processes. They’re amazing and crazy skilled people, using and improving the last technos available to craft and train models for all the solutions we offer. They wrote a neat article about the Magic Eraser so we won’t go into details that much, but long story short, it’s based on an SDXL model trained for the inpainting task. Therefore all the backend service needs is 2 inputs:
- the original bitmap picture
- a black and white bitmap, acting as a mask where the white pixels are the area to be erased by the service.
These 2 bitmaps need to be obviously of the same size, otherwise results can’t be guaranteed.

Let’s Code!
First we need to display the picture, for that we’re using Coil, providing it with a url. We’ll wrap it in a box because on top of it, our users have to be able to draw/brush.
      Box{
        ProperShotImage(
            modifier = Modifier
                .fillMaxWidth()
                // 1
                .height(with(density) { imageHeight.value.toDp() })
                .onGloballyPositioned {
                    with(density) {
                        // 2
                        imageContainerSize =
                            DpSize(it.size.width.toDp(), it.size.height.toDp())
                    }
                },
            model = viewState.mediaUrl,
            placeHolder = ColorDrawable(Colors.White.toArgb()),
            onSuccess = { drawable ->
                // 3
                val bitmap = drawable.toBitmap()
                imageBitmap = bitmap
                with(density) {
                    imageBitmapSize =
                        DpSize(bitmap.width.toDp(), bitmap.height.toDp())
                }
            },
        )
    }
Basic stuff, ProperShotImage is a composable function wrapping the Coil one, with content scale set by default to Fit.
1 -> “imageHeight” is a float value calculated based on the screen height and the bottom part
2 -> “imageContainerSize” will hold the size of the image view
3 -> “imageBitmap” & “imageBitmapSize” will hold the image & its size (we could hold only the imageBitmap, but since the size is gonna be used a lot, at least it’s already calculated here, based on the screen density)
Now we need to display a transparent view on top of it, and draw some area when our users touch the screen.
Brush me like one of your french girls
To let the user draw, we’re using a canvas and detect drag gestures to draw path
private const val DEFAULT_STROKE_WIDTH = 24

@Composable
fun MediaEditionMagicEraserBrushMask(
    modifier: Modifier,
    imageBitmapSize: DpSize,
    brushColor: Color = Colors.Yellow,
) {

// 1
var currentPosition by remember { mutableStateOf(Offset.Unspecified) }
var currentPath by remember { mutableStateOf(Path()) }

Canvas(
    modifier = modifier
        .size(imageBitmapSize)
        .pointerInput(Unit) {
            // 2
            detectTapGestures(
                onTap = { offset ->
                    currentPath.moveTo(offset.x, offset.y)
                    currentPosition = offset
                    currentPath.lineTo(offset.x + 1, offset.y + 1)
                    currentPosition = Offset(offset.x + 1, offset.y + 1)
                    currentPosition = Offset.Unspecified
                    brushHelper.addPath(currentPath)
                    currentPath = Path()
                }
            )
        }
        .pointerInput(Unit) {
            // 3
            detectDragGestures(
                onDragStart = { offset ->
                    currentPath.moveTo(offset.x, offset.y)
                    currentPosition = offset
                },
                onDrag = { change, _ ->
                    currentPath.lineTo(change.position.x, change.position.y)
                    currentPosition = change.position
                },
                onDragEnd = {
                    currentPosition = Offset.Unspecified
                    brushHelper.addPath(currentPath)
                    currentPath = Path()
                }
            )
        }
        // 4
        .graphicsLayer {
            alpha = 0.7f
        }
    ) {
        // 5
        with(drawContext.canvas.nativeCanvas) {
            val checkPoint = saveLayer(null, null)
            brushHelper.paths.forEach {
                drawPath(
                    color = brushColor,
                    path = it.path,
                    style = Stroke(
                        width = DEFAULT_STROKE_WIDTH.dp.toPx(),
                        cap = StrokeCap.Round,
                        join = StrokeJoin.Round,
                    )
                )
            }

            if (currentPosition != Offset.Unspecified) {
                drawPath(
                    color = brushColor,
                    path = currentPath,
                    style = Stroke(
                        width = DEFAULT_STROKE_WIDTH.dp.toPx(),
                        cap = StrokeCap.Round,
                        join = StrokeJoin.Round,
                    )
                )
            }
            restoreToCount(checkPoint)
        }
    }
}
Few things to notice here:
1 -> we declare currentPosition and currentPath properties to handle gestures. currentPath holds the current path being brushed (tap or drag) whereas currentPosition is useful to determine wether we’re brushing or not
2 -> on tap, we assign them with the tap position and draw a small point (it’s actually a line of 1 pixel long). We then save them to a helper we’ll see right after
3 -> on drag, we assign them with the start position and draw lines along the drag changes. When drag is over, we save the path to the helper
4 -> we want the brushes to have some alpha, and we initially put that alpha on the path color, but we noticed that when paths overlap each other, the alpha also accumulates, resulting in losing the transparency as more paths were overlapping. So instead we applied the alpha on the canvas layer. No more issues with that.
5 -> we eventually draw the existing paths and the one that is being brushed. Notice the checkPoint, it’s not really useful here, but by reflex we always use one when playing with canvas (check its usage for yourself)
Now let’s take a look at the helper. It holds references to the already drawn paths and handle logic to undo/redo. It’s also helping us saving/restoring the current state, as when the generation is done, we display the result on another screen, and navigating back to it need some saving mechanism. We could have used rememberSaveable, but then we would have had to create custom savers. We decided to use the VM instead. Here is what its interface looks like:
interface MagicEraserBrushHelper {
    val paths: SnapshotStateList<MediaEditionMagicEraserPathWithPropertiesUiModel>
    val canUndo: State<Boolean>
    val canRedo: State<Boolean>
    val canGenerate: State<Boolean>

    fun setCanvasSize(canvasSize: DpSize)
    fun addPath(path: Path)
    fun undo()
    fun redo()
    fun generateBitmap(targetSize: DpSize): Bitmap
    fun getPathsToSave(): MediaEditionMagicEraserSavedPathsUiModel
    fun restore(
        savedPaths: MediaEditionMagicEraserSavedPathsUiModel,
    )
}
And its implementation:
private class MagicEraserBrushHelperImpl(val density: Density) : MagicEraserBrushHelper {
    private var canvasSize: DpSize = DpSize.Unspecified
    private val pathsUndone = mutableStateListOf<MediaEditionMagicEraserPathWithPropertiesUiModel>()
    private var currentPathProperties =
        MediaEditionMagicEraserPathPropertiesUiModel(DEFAULT_STROKE_WIDTH)

    private val _paths = mutableStateListOf<MediaEditionMagicEraserPathWithPropertiesUiModel>()
    override val paths: SnapshotStateList<MediaEditionMagicEraserPathWithPropertiesUiModel> = _paths

    override val canUndo: State<Boolean>
        get() = derivedStateOf { _paths.isNotEmpty() }

    override val canRedo: State<Boolean>
        get() = derivedStateOf { pathsUndone.isNotEmpty() }

    override val canGenerate: State<Boolean>
        get() = derivedStateOf { _paths.isNotEmpty() }

    override fun setCanvasSize(canvasSize: DpSize) {
        this.canvasSize = canvasSize
    }


    override fun addPath(path: Path) {
        _paths.add(MediaEditionMagicEraserPathWithPropertiesUiModel(path, currentPathProperties))
        pathsUndone.clear()
    }

    override fun setCurrentPathProperties(pathProperties: MediaEditionMagicEraserPathPropertiesUiModel) {
        this.currentPathProperties = pathProperties
    }

    override fun undo() {
        if (_paths.isNotEmpty()) {
            val lastPathWithProperties = _paths.last()
            _paths.remove(lastPathWithProperties)

            pathsUndone.add(lastPathWithProperties)
        }
    }

    override fun redo() {
        if (pathsUndone.isNotEmpty()) {
            val lastPathWithProperties = pathsUndone.last()
            pathsUndone.remove(lastPathWithProperties)
            paths.add(lastPathWithProperties)
        }
    }

    override fun generateBlackAndWhiteMaskBitmap(targetSize: DpSize): Bitmap {
        val bitmap = Bitmap.createBitmap(
            with(density) { canvasSize.width.toPx() }.toInt(),
            with(density) { canvasSize.height.toPx() }.toInt(),
            Bitmap.Config.ARGB_8888
        )
        val canvas = Canvas(bitmap)
        _paths.forEach {
            canvas.drawPath(
                it.path.asAndroidPath(),
                with(density) {
                    android.graphics.Paint().apply {
                        style = android.graphics.Paint.Style.STROKE
                        color = Colors.White.toArgb()
                        strokeWidth = it.properties.strokeWidth.dp.toPx()
                        strokeCap = Cap.ROUND
                        strokeJoin = Join.ROUND
                    }
                }
            )
        }
        canvas.drawBitmap(bitmap, 0f, 0f, null)
        return Bitmap.createScaledBitmap(
            bitmap,
            with(density) { targetSize.width.toPx() }.toInt(),
            with(density) { targetSize.height.toPx() }.toInt(),
            false
        )
    }

    override fun getPathsToSave(): MediaEditionMagicEraserSavedPathsUiModel =
        MediaEditionMagicEraserSavedPathsUiModel(
            paths = _paths.toPersistentList(),
            undonePaths = pathsUndone.toPersistentList(),
        )

    override fun restore(savedPaths: MediaEditionMagicEraserSavedPathsUiModel) {
        savedPaths.paths.forEach {
            _paths.add(it)
        }
        savedPaths.undonePaths.forEach {
            pathsUndone.add(it)
        }
    }
}
You notice there’s also a generateBlackAndWhiteMaskBitmap method. That’s because we made the choice here to have 2 canvas, the one displayed to the user, consuming the gestures and showing the paths and a separate one, black & white, not displayed, that is sent to the API. We did so because manipulating the existing canvas (like altering the color for black & white) would be visible to the user, so generating the one needed by the API on the generate button click seems more relevant.
Eventually, we wrap it around a remember composable
@Composable
fun rememberMagicEraserBrushHelper(): MagicEraserBrushHelper {
    val density = LocalDensity.current
    val helper = remember { MagicEraserBrushHelperImpl(density) }
    return helper
}
Size matters
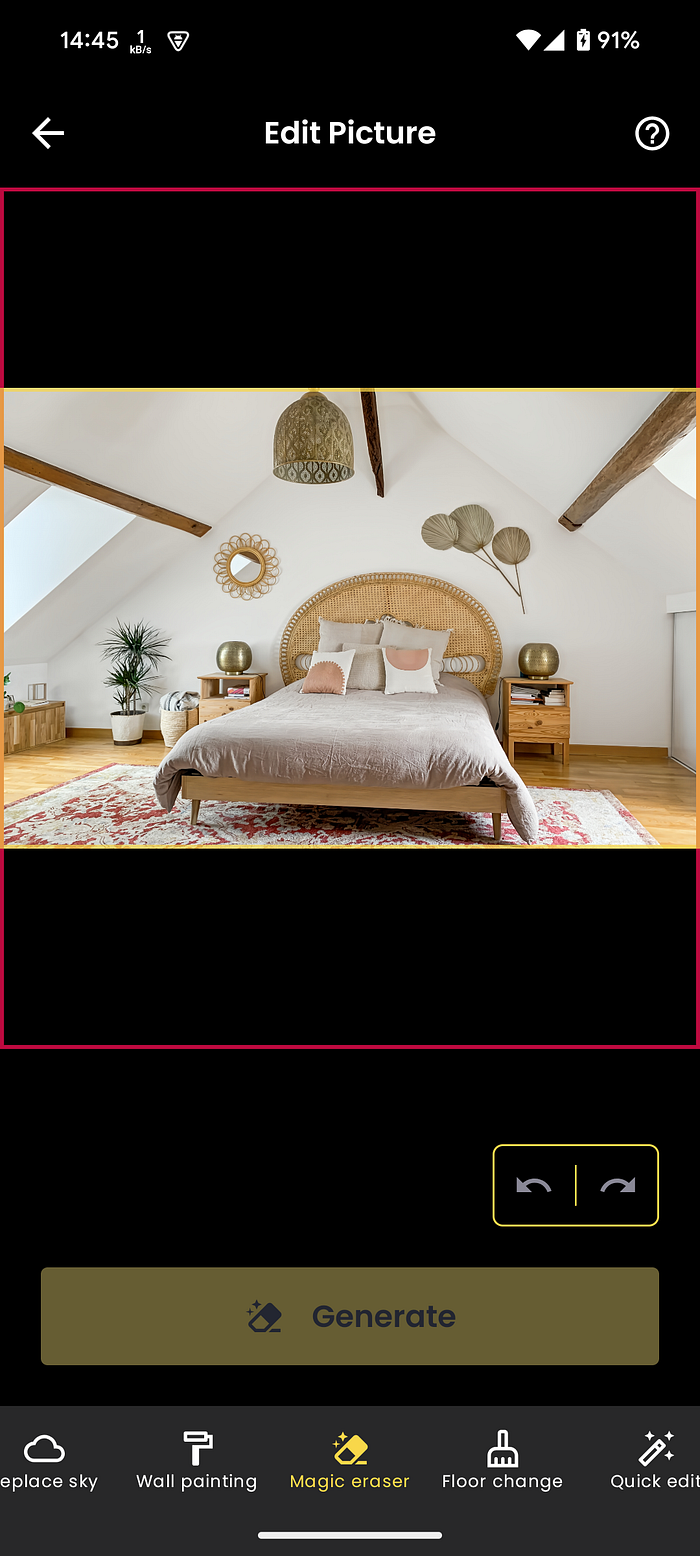
Now that our users can brush on the canvas, we need to address one detail. The brushed area must match with the picture area, otherwise the feature won’t be working properly. That means that we need to ensure that the canvas we’re showing on top of the picture is well positioned and has the proper size. Look at the screenshots (red borders show the image container, they yellow one the canvas) when we set the same size as the image displayed:

When we display the image, we give the container the constraint of maxFullWidth. With the scale content parameter set to Fit, our image will keep its original ratio, but its dimension are going to change, adapting to the container view. So an image of 940x745, can become something like 1080x856. Depending on the orientation, the width and height can both change. So thanks to some concepts learned in school (cross multiplication hello) we’re gonna be able to deduce the proper size to apply to the canvas. Let’s see that:
val canvasSize by remember(imageContainerSize, imageBitmapSize) {
    derivedStateOf {
        val containerRatio = imageContainerSize.width / imageContainerSize.height
        val bitmapRatio = imageBitmapSize.width / imageBitmapSize.height
        if (containerRatio > bitmapRatio) {
            DpSize(
                width = imageContainerSize.height * bitmapRatio,
                height = imageContainerSize.height,
            )
        } else {
            DpSize(
                width = imageContainerSize.width,
                height = imageContainerSize.width / bitmapRatio,
            )
        }
    }
}
We first calculate both ratios, and if the container one is greater, we adjust the width based on the bitmap ratio, otherwise we change the height. When we now apply that size to the canvas, we get a perfect match!
Zoom is in the air
The feature is starting to look good, but we now want our users to be able to zoom so that they can have a better precision on the area they’re brushing. The idea here is to have brushes from different size, depending on the zoom level. Let’s see how we can achieve that.
First we need to make sure that when the user zoom in the canvas, we apply it also to the picture behind it. For that, we just create a zoomState, and pass the zoom scale back to our parent composable, the one that display the picture:
val zoomState = rememberZoomState()

LaunchedEffect(zoomState.scale) {
    onScaleChanged(zoomState.scale)
}

Canvas(
        modifier = modifier
            .size(canvasSize)
            .zoomable(
                zoomState = zoomState,
            )
            .pointerInput(Unit) {
            ...
in the parent:
var magicEraserBrushMaskScale by remember { mutableFloatStateOf(1f) }

ProperShotImage(
    modifier = Modifier
        .fillMaxWidth()
        .height(with(density) { imageHeight.value.toDp() })
        .graphicsLayer {
            scaleX = magicEraserBrushMaskScale
            scaleY = magicEraserBrushMaskScale
        }
        ...

MediaEditionMagicEraserBrushMask(
    modifier = Modifier.align(Alignment.Center),
    imageContainerSize = imageContainerSize,
    imageBitmapSize = imageBitmapSize,
    onScaleChanged = { scale ->
        magicEraserBrushMaskScale = scale
    },
Now the zoom corresponds, but while zooming, the offset must be also passed down to the picture below, so adding:
LaunchedEffect(zoomState.offsetX, zoomState.offsetY) {
    onOffsetChanged(Offset(zoomState.offsetX, zoomState.offsetY))
}
In the parent:
var magicEraserBrushMaskOffset by remember { mutableStateOf(Offset.Zero) }

ProperShotImage(
    modifier = Modifier
        .fillMaxWidth()
        .height(with(density) { imageHeight.value.toDp() })
        .graphicsLayer {
            scaleX = magicEraserBrushMaskScale
            scaleY = magicEraserBrushMaskScale
            translationX = magicEraserBrushMaskOffset.x
            translationY = magicEraserBrushMaskOffset.y
        }
        ...

MediaEditionMagicEraserBrushMask(
    modifier = Modifier.align(Alignment.Center),
    imageContainerSize = imageContainerSize,
    imageBitmapSize = imageBitmapSize,
    onScaleChanged = { scale ->
        magicEraserBrushMaskScale = scale
    },
    onOffsetChanged = { offset ->
        magicEraserBrushMaskOffset = offset
    }
Now we can address the brushing while zoomed in. If we don’t adapt the brush width with the scale, we don’t really get a finer selection as the brush is gonna look pretty big on the canvas. To do so, we define a strokeWidth property that we update when the scale changes, itself triggering an update of the current path properties:
// 1
var strokeWidth by remember { mutableIntStateOf(DEFAULT_STROKE_WIDTH) }

// 2
val currentPathProperties by remember(strokeWidth) {
        val pathProperties = MediaEditionMagicEraserPathPropertiesUiModel(strokeWidth = strokeWidth)
        brushHelper.setCurrentPathProperties(pathProperties)
        mutableStateOf(pathProperties)
    }

// 3
LaunchedEffect(zoomState.scale) {
    onScaleChanged(zoomState.scale)
    strokeWidth = (DEFAULT_STROKE_WIDTH * (1 / zoomState.scale)).toInt()
}

...

          // 4
          if (currentPosition != Offset.Unspecified) {
                drawPath(
                    color = Colors.Camera,
                    path = currentPath,
                    style = Stroke(
                        width = currentPathProperties.strokeWidth.dp.toPx(),
                        cap = currentPathProperties.strokeCap,
                        join = currentPathProperties.strokeJoin
                    )
                )
            }
1 -> defining the mutable state strokeWidth var
2 -> wrapping it in a PathProperties object and defining the currentPathProperty mutable state. We’re also saving it in the helper, so that when the current brush is done, we properly save it.
3 -> when zoom scale changes, the strokeWidth is updated, updating also the current path properties
4 -> drawing the current brush with the current path properties
And that’s it now our users can zoom in and brush with a finer selection. There’s one last thing to address though…
In order to give the canvas the zooming capability, we’re using the excellent zoomable library by Atsushi USUI, but when zoomed-in, a single tap is consumed to move around in the canvas and that’s not what we desire. When zoomed-in, our users should still be able to do a single tap to brush and use 2 fingers to move around. So we had to tweak it a little bit (we rudely copied the files and modified it to alter its behavior, still need to do a PR on the repo 😅) by adding a property to the zoomable modifier:
Canvas(
    modifier = modifier
        .size(canvasSize)
        .zoomable(
            zoomState = zoomState,
            consumeSingleTouchWhileZoomedIn = false,
        )
        .pointerInput(Unit) {
...
And voila, we finally got our feature! User can brush any area, zoom and have a finer selection. But after enjoying the result, we also played with what Google offers in their Photo application, and the least to say is that we were amazed by their ability to select and brush an object just by clicking on it, the Magic Touch. So needless to say we wanted to give it a try and achieve the same result in our application.
The Magic Touch
That feature relies on what we call “image segmentation”, i.e. analyzing an image and detect shapes/object in it. In the ProperShot app, we’re already using TensorFlow to run some in-house models about different usages, but asking our CV team to train a model for that would have brought some delay to the deadline. So we went on a search for some models out there on the web. We found some interesting things on huggingface but we also look into the MediaPipe solutions from Google. If you never heard of it, it’s a framework providing developers with libraries and already trained models, developed and maintained since 2022. In there we found the perfect image segmentation model (MagicTouch) and decided to go for it.
So after adding the MediaPipe dependency and the models in the app project, let’s create the segmenter helper:
interface MediaEditionMagicEraserSegmentationHelper {
    fun setBitmapSize(width: Int, height: Int)
    fun segment(x: Float, y: Float)
}
and its implementation:
private class MediaEditionMagicEraserSegmentationHelperImpl(
    originalImage: Bitmap,
    private val context: Context,
    private val maskColor: Color,
    private val onError: (String) -> Unit,
    private val onSuccess: (Bitmap) -> Unit,
    private val scope: CoroutineScope,
) : MediaEditionMagicEraserSegmentationHelper {

    companion object {
        private const val MODEL = "magic_touch_model.tflite"
    }

    // 1
    private var segmenter: InteractiveSegmenter? = null
    private var inputImage: Bitmap = if (originalImage.config == Bitmap.Config.ARGB_8888) {
        originalImage
    } else {
        originalImage.copy(Bitmap.Config.ARGB_8888, false)
    }

    // 2
    override fun setBitmapSize(width: Int, height: Int) {
        inputImage = Bitmap.createScaledBitmap(
            inputImage,
            width,
            height,
            false
        )
    }

    // 3
    override fun segment(x: Float, y: Float) {
        clear()
        setupInteractiveSegmenter()
        val roi = InteractiveSegmenter.RegionOfInterest.create(
            NormalizedKeypoint.create(
                x,
                y
            )
        )
        val mpImage = BitmapImageBuilder(inputImage).build()
        segmenter?.segmentWithResultListener(mpImage, roi)
    }

    private fun setupInteractiveSegmenter() {
        val baseOptionBuilder = BaseOptions.builder()
            .setModelAssetPath(MODEL)

        try {
            val baseOptions = baseOptionBuilder.build()
            val optionsBuilder =
                InteractiveSegmenter.InteractiveSegmenterOptions.builder()
                    .setBaseOptions(baseOptions)
                    .setOutputCategoryMask(true)
                    .setOutputConfidenceMasks(true)
                    .setResultListener(this::processResult)
                    .setErrorListener(this::processError)

            val options = optionsBuilder.build()
            segmenter =
                InteractiveSegmenter.createFromOptions(context, options)

        } catch (e: Exception) {
            onError(
                e.localizedMessage
                    ?: "Interactive segmentation failed to initialize. See error logs for details"
            )
        }
    }

    // 4
    private fun processResult(
        result: ImageSegmenterResult,
        mpImage: MPImage,
    ) {
        scope.launch {
            val byteBuffer = ByteBufferExtractor.extract(result.categoryMask().get())
            val resultBitmap = getMaskResult(byteBuffer, mpImage.width, mpImage.height)
            withContext(Dispatchers.Main) {
                onSuccess(resultBitmap)
            }
        }
    }

    private suspend fun getMaskResult(
        byteBuffer: ByteBuffer,
        maskWidth: Int,
        maskHeight: Int,
    ): Bitmap {
         val pixels = IntArray(byteBuffer.capacity())
         for (i in pixels.indices) {
           val index = byteBuffer.get(i).toInt()
           val color = if (index == 0) Color.TRANSPARENT else maskColor
           pixels[i] = color
         }

        val bitmap = Bitmap.createBitmap(
            pixels,
            maskWidth,
            maskHeight,
            Bitmap.Config.ARGB_8888
        )

        val scaleFactor =
            min(inputImage.width * 1f / bitmap.width, inputImage.height * 1f / bitmap.height)
        val scaleWidth = (bitmap.width * scaleFactor).toInt()
        val scaleHeight = (bitmap.height * scaleFactor).toInt()
        return Bitmap.createScaledBitmap(bitmap, scaleWidth, scaleHeight, false)
    }


    private fun processError(error: RuntimeException) {
        onError(error.message.toString())
    }

    private fun clear() {
        segmenter?.close()
        segmenter = null
    }
}
1 -> the help implementation take some parameters as constructor, like the original image and since it’s an async process, some callbacks are to be set. We then define some private properties, like the InteractiveSegmenter from the MediaPipe lib, and making sure the original bitmap is well configured as ARGB_8888 (otherwise it crashes)
2 -> like we do for the canvas, since the size is dynamic, we need to assign it to the original image passed in the constructor so that it matches what’s really display on screen
3 -> the segment method is the one called upon user tap, given the position (x,y). The segmenter is initialized via its builder, then we create from the position a region of interest, that is passed to the segmenter, along with the image turned into a MPImage which is the MediaPipe wrapper for image objects. Under the hood, TensorFlow is called with the segmenter model and the inputs we gave, abstracting the input/output mapping that can be quite scary… That’s the power of the library, making it relatively straightforward to take advantage of AI!
4 -> the result (an MPImage) is then converted as a ByteBuffer so that we can iterate on each pixel and apply the proper color based on the model response. Eventually a new bitmap with the array of color pixel is created and properly resized!
Finally, we need to adapt few things in the existing code. First we need to instantiate the segmentation helper:
@Composable
fun rememberMagicEraserSegmenterHelper(
    originalImage: Bitmap,
    maskColor: androidx.compose.ui.graphics.Color,
    onError: (String) -> Unit,
    onSuccess: (Bitmap) -> Unit,
): MediaEditionMagicEraserSegmentationHelper {
    val context = LocalContext.current
    val scope = rememberCoroutineScope()
    val helper = remember {
        MediaEditionMagicEraserSegmentationHelperImpl(
            originalImage = originalImage,
            context = context,
            maskColor = maskColor,
            onError = onError,
            onSuccess = onSuccess,
            scope = scope,
        )
    }
    return helper
}

val segmentationHelper = rememberMagicEraserSegmenterHelper(
    originalImage = imageBitmap,
    maskColor = brushColor,
    onError = {
        Timber.e("Magic Eraser segmentation helper error:$it")
    },
    onSuccess = {
        brushHelper.addBitmap(it)
    }
)
As you can see, we added a addBitmap method to the brush helper so that we can draw the mask on the canvas
override fun addBitmap(bitmap: Bitmap) {
    _draws.add(
        MediaEditionMagicEraserDrawUiModel.Bitmap(bitmap = bitmap)
    )
    undoneDraws.clear()
}
The draw ui model was only taking paths, now it’s also taking a bitmap
@Immutable
sealed interface MediaEditionMagicEraserDrawUiModel {
    @Immutable
    data class PathWithProperties(
        val path: androidx.compose.ui.graphics.Path,
        val properties: MediaEditionMagicEraserPathPropertiesUiModel,
    ) : MediaEditionMagicEraserDrawUiModel

    data class Bitmap(val bitmap: android.graphics.Bitmap) : MediaEditionMagicEraserDrawUiModel
}

@Immutable
data class MediaEditionMagicEraserPathPropertiesUiModel(
    val strokeWidth: Int,
    val strokeCap: StrokeCap = StrokeCap.Round,
    val strokeJoin: StrokeJoin = StrokeJoin.Round,
)
And the updated canvas drawing:
brushHelper.draws.forEach {
    when (it) {
        is MediaEditionMagicEraserDrawUiModel.PathWithProperties -> {
            drawPath(
                color = brushColor,
                path = it.path,
                style = Stroke(
                    width = it.properties.strokeWidth.dp.toPx(),
                    cap = it.properties.strokeCap,
                    join = it.properties.strokeJoin
                )
            )
        }

        is MediaEditionMagicEraserDrawUiModel.Bitmap -> {
            drawBitmap(it.bitmap, 0f, 0f, null)
        }
    }
}
And WOW, now when we click on an object of the image, the image segmenter will return a mask, brushing the object! The inference time is very good, around 200ms on a Pixel 8a and can go up to 300/400ms on older devices but overall the performances are just fine for the user experience, we don’t even need to add a loader.
Improving the Magic Touch
After testing the implementation, we stumbled upon one issue when combining the Magic Touch with our backend service. Our magic eraser model has really great performance when the object selection goes over its edges and spill over a it, so when the image segmenter returns an area, we have to extend and dilate it by some pixels. After some consultations with the CV team and many attempts we got a result by creating a class called FastDilator combining SIMD operations and scanning-line operations:
class FastDilator(private val width: Int, private val height: Int, private val maskColor: androidx.compose.ui.graphics.Color) {

    companion object {
        private const val DILATION_RADIUS = 30
    }

    suspend fun dilateArea(
        byteBuffer: ByteBuffer,
        dilationRadius: Int = DILATION_RADIUS,
    ): IntArray =
        withContext(Dispatchers.Default) {

            // Step 1: Create binary map using SIMD
            val binaryMap = createBinaryMapSIMD(byteBuffer)
            byteBuffer.position(0)

            // Step 2: Initialize and compute distance map using scanning-line
            val distanceMap = IntArray(width * height) { Int.MAX_VALUE }
            computeDistanceTransform(binaryMap, distanceMap)

            // Step 3: Create final dilated image using SIMD
            createDilatedImageSIMD(distanceMap, dilationRadius)
        }

    private fun createBinaryMapSIMD(byteBuffer: ByteBuffer): BooleanArray {
        val result = BooleanArray(width * height)
        val vectorSize = 8
        val fullVectors = width * height / vectorSize

        for (i in 0 until fullVectors) {
            val baseIndex = i * vectorSize
            val bytes = ByteArray(vectorSize)
            byteBuffer.get(bytes)

            // Process 8 bytes at once
            repeat(vectorSize) { j ->
                result[baseIndex + j] = bytes[j].toInt() == 0
            }
        }

        // Handle remaining bytes
        for (i in (fullVectors * vectorSize) until width * height) {
            result[i] = byteBuffer.get().toInt() == 0
        }

        return result
    }

    private fun computeDistanceTransform(binaryMap: BooleanArray, distanceMap: IntArray) {
        // Initialize phase
        for (i in binaryMap.indices) {
            if (binaryMap[i]) distanceMap[i] = 0
        }

        // Forward scan
        for (y in 0 until height) {
            for (x in 0 until width) {
                val idx = y * width + x
                if (distanceMap[idx] != 0) {
                    val up = if (y > 0) distanceMap[idx - width] else Int.MAX_VALUE
                    val left = if (x > 0) distanceMap[idx - 1] else Int.MAX_VALUE

                    val minValue = min(up, left)
                    if (minValue != Int.MAX_VALUE) {
                        distanceMap[idx] = minValue + 1
                    }
                }
            }
        }

        // Backward scan
        for (y in height - 1 downTo 0) {
            for (x in width - 1 downTo 0) {
                val idx = y * width + x
                if (distanceMap[idx] != 0) {
                    val down = if (y < height - 1) distanceMap[idx + width] else Int.MAX_VALUE
                    val right = if (x < width - 1) distanceMap[idx + 1] else Int.MAX_VALUE
                    val current = distanceMap[idx]

                    val minValue = min(down, right)
                    if (minValue != Int.MAX_VALUE) {
                        distanceMap[idx] = min(current, minValue + 1)
                    }
                }
            }
        }

        // Square the distances to match the original distance calculation
        for (i in distanceMap.indices) {
            if (distanceMap[i] != Int.MAX_VALUE) {
                distanceMap[i] *= distanceMap[i]
            }
        }
    }

    private fun createDilatedImageSIMD(distanceMap: IntArray, dilationRadius: Int): IntArray {
        val result = IntArray(width * height)
        val radiusSquared = dilationRadius * dilationRadius

        // Process 4 pixels at a time
        val vectorSize = 4
        val fullVectors = distanceMap.size / vectorSize

        for (i in 0 until fullVectors) {
            val baseIndex = i * vectorSize
            repeat(vectorSize) { j ->
                val idx = baseIndex + j
                result[idx] = if (distanceMap[idx] <= radiusSquared) maskColor.toArgb()
                else Color.TRANSPARENT
            }
        }

        // Handle remaining pixels
        for (i in (fullVectors * vectorSize) until distanceMap.size) {
            result[i] = if (distanceMap[i] <= radiusSquared) maskColor.toArgb()
            else Color.TRANSPARENT
        }

        return result
    }
}
and calling it when the image segmenter returns the result mask:
private suspend fun getMaskResult(
    byteBuffer: ByteBuffer,
    maskWidth: Int,
    maskHeight: Int,
): Bitmap {
    val dilatedPixels = dilateImage(byteBuffer, maskWidth, maskHeight)

    val bitmap = Bitmap.createBitmap(
        dilatedPixels,
        maskWidth,
        maskHeight,
        Bitmap.Config.ARGB_8888
    )

    val scaleFactor =
        min(inputImage.width * 1f / bitmap.width, inputImage.height * 1f / bitmap.height)
    val scaleWidth = (bitmap.width * scaleFactor).toInt()
    val scaleHeight = (bitmap.height * scaleFactor).toInt()
    return Bitmap.createScaledBitmap(bitmap, scaleWidth, scaleHeight, false)
}

private suspend fun dilateImage(byteBuffer: ByteBuffer, width: Int, height: Int): IntArray {
    val dilator = FastDilator(width = width, height = height, maskColor = maskColor)
    return dilator.dilateArea(byteBuffer)
}
Now when we tap on a object, the returned area is bigger that the object by 30 pixels, which is enough for the magic eraser model to pull out perfect result!
Magic Touch limitation
So after obtaining some really good results on both performance and user experience, we saw some limitations though:
- the Magic Touch model trained by Google is not perfect, sometimes you need to tap on a object multiple times before the selection matches the pointed object, and even then, if the image or the object contours are too complex, the model won’t properly detect it… So maybe creating and training our own model is worth it on the long run (Sofia Kirillova wrote an amazing article on the matter)
- the MediaPipe library is quite heavy (~42MB) and the magic touch model itself too (~6MB) so for an app that is around 17MB when downloading from the Playstore, the impact on the size is huge… Even with R8 optimizations, having our app size to be that altered that way for just one feature is something to be considered. Since we’re already using TensorFlow in the app, a big improvement would be to use the Magic Touch model directly without the MediaPipe wrapping, but that means handling the input/output ourselves, and that’s something that can really drive you crazy…
Final words
In the end, implementing the Magic Eraser was a fun way to play around with canvas. Brushing on mobile can be a difficult experience but we’re confident we made it practical and easy to use. As for the Magic Touch, and because of the limitations mentioned above, we decided to deploy the feature in production without it, giving us time to properly make it perfect. We’re an AI powered solutions company, so we’ll have no issue creating our own model and get rid of the enormous MediaPipe library (even though Google did an amazing job on it).
Don’t hesitate to try our solutions on the web app, on App Store or on Google Play.
You can also find us here and if you liked the article, let’s connect!
Finally don’t hesitate to give your feedbacks on the article comment sections!